Welcome to Day #10 of the LBH 12 Days of Ornaments feature!
Cheryl McCarson here...I have the great privilege of sharing my ornament with you today!
Cheryl McCarson here...I have the great privilege of sharing my ornament with you today!
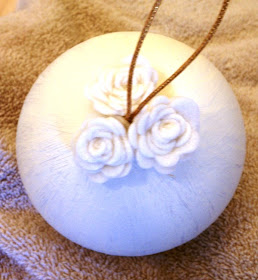
This ornament will require quite a bit of patience,
but as you can see, the results are well worth it!
Designed by: Cheryl McCarson

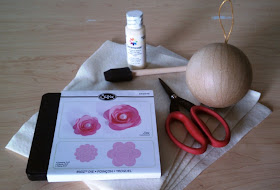
Here are the supplies I used:
5 sheets of your favorite color of felt
(You can also use paper or craft metal, but the
felt was very user friendly and beautiful!)
Coordinating paint and paint brush
Paper mache ornament - round works best (I used a 4" diameter ornament)
Sizzix Flower 3-D Die Cut - available for purchase or use at the LBH
Scissors that will cut felt.
..
Let the fun begin!
The ornament will mostly be covered with Roses but it is
possible that the ornament will peek through.
.
That is roughly 2-1/4" squares.
Turn up one end of the felt about 2-1/4",
then fold it again on itself
and repeat the whole length of the sheet.
When you are finished, all the lengths should be about the same.
.
.
Cut along the folds.
Repeat these steps until you have about 90 to 95 squares.
(Yes, that means you will end up with that many roses!)
.
You will cut the small rose.
.
.
and roll the felt onto itself. This is creating the rose from the inside out.
.
.
When you get to the end, place a drop of hot glue
to attach the rose to the bottom.
If you would rather apply all the hot glue at once,
you can just set the rose aside.
The felt is easy to work with.
It will not unravel the rose you just made because it sticks to itself!
.
If the Sizzix Flower 3-D Die Cut is not available to you,
you have another option.
Use a quilters pen that is disappearing ink and draw a swirl
on the felt square as cut in the previous instruction.
.
.
.
begin at the outer edge of the swirl and roll the felt onto itself.
This is creating the rose from the inside out.
.
.
 Glue the bottom to the rose to keep it from unravelling. If you want to use the hot glue all at once, you can set the flower aside. The felt flower will not unravel because it sticks to itself!
 Glue the bottom to the rose to keep it from unravelling. If you want to use the hot glue all at once, you can set the flower aside. The felt flower will not unravel because it sticks to itself!
.

Your flowers will be pretty, no matter which you use!
.
.
.
 Wow, that was work, but they are beautiful! These would look fabulous on the tree or consider hanging a few of these lovely ornaments from your chandelier with some beautiful ribbons...
What a wonderful way to add a little design detail to your lighting this time of year!
.
 Wow, that was work, but they are beautiful! These would look fabulous on the tree or consider hanging a few of these lovely ornaments from your chandelier with some beautiful ribbons...
What a wonderful way to add a little design detail to your lighting this time of year!
.
I hope you enjoyed my tutorial and will give this fabulous floral technique!
Now for my Question of the Day:
Do you have a special way of displaying the Christmas Cards that you receive during the Holidays?
Post your comments and share with us....You may be the lucky commenter that will win my Rose Blossom Ornament!
Merry Christmas!
Cheryl
The WINNER from Day #9 is....KAREN E.!!
Congratulations Karen! Please contact the LBH to claim your ornament!.


I LOVE those sweet little roses!!! They could be used for so many different things ~
ReplyDeleteBeautiful! Just love the inspiration!
ReplyDeleteFor Holiday cards, I have a photo tree that I clip all the cards too. Love having them out in the open!
Oh La LA! I love this .. roses are my favorites and I have everything to make this.. Thanks for the inspiration Cheryl..
ReplyDeleteI display my Christmas cards inside a huge frame of family pictures I have in my entry way.... they surround my family by Christmas day
Happy Holidays
So pretty. I am out of town but I brought that die with me. Guess I need to start making roses. I have a metal container that looks like it is made from an old ceiling tile. It hangs on a hook and that is what I put Christmas cards in.
ReplyDeleteVERY pretty! I like to display all my cards on a sort of "clothes line" in my living-dining room. I hang some yarn or twine like a garland around the room. The cards either fold over the line or I clip them on with decorative paper clips and clothes pins. I also hang holly or ornaments at different intervals to space out the cards. The cards are easy to take down to read, but also out of the way.
ReplyDeleteLove, love, love the roses! My mom made a bear holding a basket that matches my kids stockings and that is where I put my cards.
ReplyDeletewow, what a beautiful ornament!! I love it ...
ReplyDeleteI have a Christmas Joy box Judi M gave me a few years back and I keep my cards in there.
These are beautiful ornaments! For my cards, I usually tuck them in the greenery on my mantle.
ReplyDeleteWow Cheryl! This ornament is FABULOUS! I don't really have a card display, but I do set them out. I have a holder that is made of a rolled up wicker looking doormat with a poinsetta attached on top. I set it near my piano and put the cards in it as they come in. I also have cards from years past in it.
ReplyDeleteWhat a cute ornament!
ReplyDeleteI love this ornament! I will make several of these they are so beautiful! Thanks so much for sharing with us! Linn
ReplyDeleteI love the rose ornament. I am going to have to give that a try.
ReplyDeleteCheryl, love the ornament. Have that dye and will need to get busy. I haven't displayed my cards in a while, but reading these comments have some good ideas.
ReplyDeleteHow can we possibly be on day 10 already! Seems like we just started. Time flies when your having fun! I used to display my cards are my wooden blinds by putting them through all the slats and by the end of the season all my windows were covered with cards. We don't have those kind of blinds in this house, but I do have any area where I put my favorites and when the season is over I put all my faves and everyone's pictures in a Christmas scrapbook, that goes back to around 1999 or so. I love looking back through it and seeing all my long distance friends and family through the years.
ReplyDeleteNice ornament Cheryl! I tape all my cards on the door to our coat closet. After Christmas I take bits of each card and do a collage in my journal.
ReplyDeleteCheryl, that is an exquisite ornament!! I know it will be cherished from year to year because of all the work you put into it!!
ReplyDeleteEvery year I hang my Christmas cards on a large shutter that leans against the wall by our kitchen table. The Christmas cards are left there all year because they are so pretty!!