"ONE AWESOME BOY" Layout
Susan Tidwell here to share another layout tutorial with you featuring Echo Park's "Jack" paper collection. This collection is so cute and is perfect for boy layouts and projects! I love that it has two 12" x 12" sticker sheets and lots of other
embellishments that coordinate.
embellishments that coordinate.
Let's get started!
SUPPLY LIST
(1) 12"x12" white card stock, plus a small scrap *
(2) 4"x 6" navy cardstock *
star stencils or dies in different sizes
Ranger Distress Paint - Ripe Persimmon *
18" narrow red and white stripe ribbon *
dimensional foam dots - thin and thick *
White Uniball Signo pen *
White Uniball Signo pen *
(*products available in store only)
INSTRUCTIONS
1. Cut a strip of the Referee Invisible sheet measuring 3 inches from the center point of the decorative shape. (I used the stripes horizontally, but you could also cut another edge so the stripes run vertically.) Paint curved edges with Distress Paint (not shown) and let dry. From remaining Invisible sheet cut a 2 1/2" x 4" strip with stripes running vertically. Cut "v" shape from one end and set aside to add later.
2. Remove black B-O-Y stickers from Alpha Sticker sheet and adhere to white card stock scraps. Trim to size. Ink edges with Distress Ink.
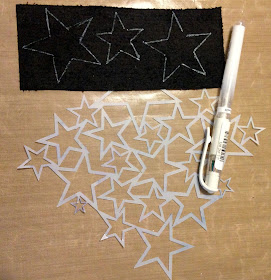
3. Use star stencil to trace 3 different size stars on back of leather. (You could also die cut the leather.) I used my favorite white pen, the Uniball Signo, so the tracing would show up on the black side. Cut out.
4. Cut "Be" from the Be Awesome sticker on the Alpha Sticker sheet. Add this sticker along with two star stickers and the small orange "O," "N," "E" alpha stickers to the Invisible shape. Glue on the smallest leather star and the BOY letters (see photo above).
5. Cut car paper 3 1/2" x 10"(diamond side) and 3" x 10" (orange car side); airplane paper 2" x 12" and wood paper 2" x 9." Cut "v" shape in ends of airplane strip. Ink edges of all four paper strips with Distress Ink and adhere to white card stock as shown in photo. Glue down the small Invisible shape in lower right corner of layout before adhering the airplane strip.
6. Center scalloped medium blue border sticker from the Element Sticker Sheet below airplane strip. Cut ribbon a little over 12" and tie knot in each end. Knot remaining piece of the ribbon around the first piece and glue on seam between airplane strip and scalloped border.
9. Mount two remaining leather stars on thick dimensional dots and place on layout. Add remaining three stickers on thick dimensional dots and add to layout.
I hope you enjoyed this tutorial and will check out the "Jack" collection, especially if you have boys! The "Jill" collection is the coordinating paper line for girls.
Happy Scrapping!


Such a CUTE layout Susan!!
ReplyDeleteSusan, the papers and layout are adorable! I know lots of LOVE was put into the making of your LO since it's featuring one of your Grandsons! (Is that Carl?)
ReplyDelete