Welcome Back to 12 Days of Ornaments Blog Series!! Are you Ready for Day 8?!?
Valerie is here with us today sharing her Golden Tree Clip Ornaments!
Here is a list of the products I used -
I am in a gold phase right now - I love everything gold -
so I went with a gold theme, but you could certainly use whichever colors you like
Burlap
Cardboard
Gold Glitter
Mod Podge
Foam Paint Brush
Twine
Small Gold Clothespins
Twine
various gold trims and ribbons
gold buttons
various chipboard embellishments
wooden ruler (I used 7 Gypsies brand)
gold spray mist
various gold embellishments to trim your tree - sequins, stickers, enamel dots
hot glue gun
glue (I used Glossy Accents)
Here are some photos of the products I used
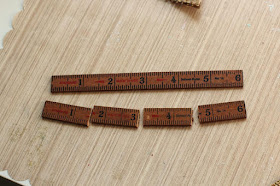
I cut the ruler into 1 1/2" pieces to use as the trunk to my trees
First take the burlap and cut it into the size of the piece of cardstock you are using. I had a scrap piece of thin cardboard that was 12"x12" that I used for this project. Apply a thick layer of Mod Podge on top of the piece of burlap that is layered on the piece of cardboard.
Make sure to apply Mod Podge across the whole piece of burlap
While the glue is wet, sprinkle the glitter liberally onto the burlap piece
Rub the glitter in with your fingertips to ensure that the whole piece gets glittery (it's messy but makes it the glitter embed into the glue so when it dries it won't flake off!)
Let the piece dry completely. After it's dry it might be curled up slightly - it's very pliable and will easily bend back in place. You can now start cutting your triangles out for your trees. They can be whatever size you like - my triangles were about 6 inches tall and 4" across the bottom base. I had enough burlap made to make 10 Christmas trees
Next you need to punch a hole at the top of tree. I used my Fastenater since it punches through thick material.
Then thread a piece of twine through the hole and tie it at the top so you can hang it.
Spray the wooden pieces with gold spray mist to give them some shimmer - I used Heidi Swapp gold spray mist.
Attach the ruler pieces to the bottom of the trees to form the trunk. I found a hot glue gun works best for this.
Now is the fun part - trim your tree however you would like. I like using ribbons as garland and a button for the star.
I use sequins and enamel dots and chipboard stars as the decorations. I found that a hot glue gun is the best thing to attach everything but the smaller embellishments. For those pieces (like the sequins) I used Glossy Accents. I even use the hot glue gun for the ribbon. When you have decorated your tree, attach one of the small clothespins to the top center of your tree with hot glue
Now you can clip a chipboard piece (or whatever you would like) to your tree.
Here are a few of the ornaments I made..
It's really hard to tell in the photos, but these are really glittery and gold! You could really go with any color that you like - silver or blue would be really pretty too!
Thank you so much for stopping by! I hope you are inspired to create and make sure to check back tomorrow for another ornament tutorial!!
Merry Crafting,
Valerie Bishop
Our Winner for Day #7 is.....
Glenda!
Congratulations!! Contact the LBH to claim your Ornament!
We have 5 days left of our 12 Days of Ornaments-
Join us tomorrow to see what Dee Dee Roe has created!


Very cute!
ReplyDeleteThese are adorable! I love the burlap texture and the fun little chipboard pieces attached with the mini clothespins! Very cute idea!
ReplyDeleteLove these!
ReplyDeleteWho doesn't love sparkling burlap??
ReplyDeleteValerie these are super cute..what a fun way to work with Burlap too..
ReplyDeleteThey look fantastic hanging on the LBH tree. Great idea. Pretty Ornament!
ReplyDeleteI love Christmas trees, And, bonus...glitter. Adding the ruler as a trunk is genius.
ReplyDeleteI love your little trees!
ReplyDelete