Showing posts with label media team. Show all posts

Monday, April 13, 2015

“ECHO PARK- ANYTHING GOES” Layout Tutorial

Hello everyone, Nadine here today to share a step by step tutorial with you on how I made my layout using Echo Park Anything Goes Collection. 
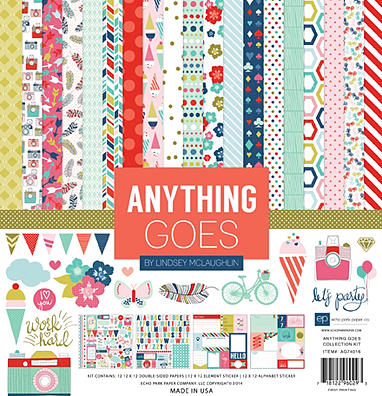

I love the colors in this collection and all the cute coordinating stickers to go with it.


Supplies Needed:
6. Gesso
7. Water paints
8. Black paint
9. Black fine tip pen
10. Ruler
11. Paintbrush
12. Bubble wrap
13. White Cardstock
14. Standard Scrappy Supplies... adhesives, trimmers, scissors
________________________________________________________________________

1. Paint and flick some water colors onto a white piece of cardstock with a paintbrush.


2. Paint some Gesso onto a 12 x 12 piece of plastic. I used the packaging from a scrapbook kit. Press a sheet of bubble wrap into the Gesso and stamp it onto the cardstock paper over the water paints.


It will look something like this.


3. Paint the edge of a large bowl or anything round with a thin edge with black paint and stamp it onto the cardstock paper.


4. Layer your picture over some various pieces of patterned papers from the Echo Park Anything Goes collection, make sure they are cut bigger than your picture. Layer those over a Jillibean Kraft Polaroid strip. Doodle some lines around the outer edge of your page with a ruler and black marker.


5. Paint a thin layer of Gesso over the Maya Road Camera Chipboard.


6. Add some color with some water colors.


7. Apply a layer of Glossy Accents. It will look whitish in color at 1st but once dry it will be clear.


8. Add some doodles around the cloud stickers and pop dot them up. Tuck some flower stickers under and around your picture and paper layers and add a few fun sequins and you are done.


Thank you for looking and happy scrapping!

Friday, March 27, 2015

Craft Market Paper Rosette Ribbon Tutorial

Hey there, it's Lindsey here with a quick tutorial using Crate Papers new line,  Craft market to make a fun paper rosette award style embellishment.

Gather your supplies....

White Pen- Sakura Gelly roll
Foam Tape

Step 1.  Using the pink and gold paper, cut approximately 7 stripes out.  I had the "V" pointed down and cut from the right hand, bottom side


Step 2.  Gather the 4 longer pieces, discard the shorter pieces.  Also cut 3/4 in strip of Doodlebug Vellum and add to the pieces. 


Step 3.  Dovetail all the pieces, I just eyeballed this with scissors.  


Step 4.  Trace the wooden loop and cut out.  Play with the lengths until you like what you see, The longest for mine was 4 inches and the shortest 3 inches.  


Step 5.  Write a sentiment on the chalkboard sticker.  I used a Sakura white gelly roll pen in my faux-calligraphy handwriting. TIP:  Don't be afraid to lightly pencil out the sentiment, once the pen has dried its very easy to go back and erase.   I let things over-dry, nothing frustrates me more than smeared pen.  ( As a lefty, I am too familiar with it)


Step 6.  Using glossy accents glue the wood hoop to the paper circle you cut out in step 4.


Step 7.  Add some foam tape behind the chalkboard sticker 


Step 8.  Place chalkboard sticker in the center-ish. 


Step 9.  Select arrow from the puffy stickers and cut in half.


Step 10.  Trim the excess ribbon off the pink rose and glue using glossy accents or hot glue.  Place the pieces from the arrow on either side.  


Step 11.  I added a few more words in my handwriting to finish it off.


I hope you enjoyed this tutorial, its a fun little piece to make with all the graduations coming up- it could be added to a card, put a pin on the back and have the grad wear it.... possibilities are endless!

Thanks for stopping by, all the products used are available at the Little Blue House!

Best wishes, Lindsey

Wednesday, March 25, 2015

"Happy, Happy Day" Layout Tutorial with Susan Tidwell

 
"HAPPY, HAPPY DAY" LAYOUT
Crate Paper- Craft Market


Hi everyone, Susan T. here with a layout tutorial for you using the lovely "Craft Market" papers from Crate Paper. 
 I love the soft hues of this collection and it suited my photos of the day our newest grandson came home and his 2-year-old brother finally got to meet him.
I used an easy watercolor technique on the background using the new Cracked Pistachio Distress Ink. This new color is beautiful and matches this paper line so well.
Take a medium-size acrylic block and smoosh (technical term!)
the ink pad on it and then spritz it with water until it beads up.


"Stamp" with the inked block randomly over the "Craftsman" paper. Press down harder if you want more coverage; press lightly to get a droplet effect. Repeat this until you have the desired coverage. So much easier than painting with a brush!


Here you can see that I started where my photos would be to practice first. It gets "patchier" toward the outer edges.


I added a torn strip of Doodlebug Bubble Gum Sprinkles Vellum by machine-stitching it over a few paper elements. This eliminated the need for adhesive which will show through the vellum.
Here you can see the envelope piece cut from the "Project w/ Gold" paper and a strip of the "Thrifty" paper
(I think that paper is my favorite of all the collection!)


I continued to layer cut and torn pieces of several of the papers ("Studio," "Inspired w/ Gold", and "Thrifty") and added stickers from the Journaling and Title Accent Sticker Sheet.  
After adding my photos I embellished with the Puffy Gold Stickers (stars, hearts and arrows).


In this photo you can see a portion of the Wood Veneer Hoop that I added over the larger photo to highlight my two cute little grandsons.  I loved that it looked like a real wooden hoop so I used it as is.  I also used one of the paper strips to fold over an American Craft Paper Straw to make a flag.  The polka dot strip came from Craft Market- Studio Paper at the very bottom of this photo is actually a barcode strip from one of the papers - I love that some manufacturers add these patterns and I use them frequently!


Here you can see one of the Wood Veneer Tags w/ Gold Glitter Accents. I added number stickers from the sticker sheet for the year, added a scrap of printed paper to cover the hole of the tag and embellished with another heart puffy sticker.  I used the Wood Veneer Circle w/ Gold Glitter Accents in the upper right corner of my layout, adding the date of the photos with a gold Uniball Signo pen.

I hope you enjoyed my tutorial and love these papers and embellishments as much as I do. It's a versatile, pretty paper collection and it's available now at The Little Blue House or
online here!


Susan Tidwell
 

Friday, March 13, 2015

"Pebbles" Party - Happy Day Tutorial

Hello, Nadine here with a layout tutorial using the super cute Pebbles Inc. Happy Day collection from the Little Blue House Store.


When creating my layouts I don't usually like to use large pieces of patterned papers. 
In my tutorial, I will show you how I used lots of layers
without drawing the attention away from the picture.


Supplies Needed:

2 White Cardstock & 1 other color
3. Spray Inks
4. Grid Stamp or something similar
6. 2" Circle punch
7. Sewing machine with black thread or a black pen for faux stitching
8. Pop dots
9. Standard Scrappy Supplies.... adhesives, scissors, paper trimmer

_________________

1. On the white cardstock randomly stamp in a vertical pattern, I used a grid like stamp.


2. Flick a few different colors onto the white cardstock of spray inks.


3. Punch three 2" circles.


4. Fold the circles in half and then cut on the fold line.


5. Tear one of your patterned papers into a strip about 2" wide. Arrange your circle halves like I have in the picture below cut a thin strip of a color cardstock, glued it down and then stitch down the thin cardstock strip. If you don't have a way to sew you can always use a black pen and draw your stitches.


6. Arrange more layers of papers under your picture and the other papers layers. For the cute little word frames, I cut up one of the Happy Day Tag Frames. I pop dotted up some of the Happy Day Icons & Phrase Stickers. A small strip of the American Crafts Burlap with White Dots also added the perfect color contrast behind the picture.


Here are some close up pictures of the Pebbles Inc. Happy Day papers and embellishments so you can really take in all their cuteness. :)


Thank you for looking! Happy Scrapping!
Nadine

Tuesday, December 9, 2014

LBH 2015 Media Team Call

LBH 2015 Media Team Call
We are very excited to announce our first ever Little Blue House Media Team! The LBH is a fabulous Paper Arts Studio and Store located in Keller, TX. We are looking for a small team of Designers who have a passion for all things Creative!!! Creating with a variety of unique products and mediums from the Little Blue House and a strong understanding of social media.


What we are looking for in our
L
BH Media Team Member:
-A joy for paper crafting and/or mixed media arts
-An original design style: Creating projects with a variety of
unique products and mediums.
-Good Photography skills for taking project photos
-A love for social media and an understanding of sharing & tagging
-Experience creating photo step-out tutorials
 (video tutorials would be a plus)
-Willing and Able to commit to creating 2-3 projects/posts per month

LBH Media Team will receive: 
-A variety of products featured at the Little Blue House which will include items such as paper collections, embellishments, lotions and potions, etc…
-Recognition as an L
BH Media Team Designer and Spotlight Promotions
-Compensation (Details to be shared with the final team)
-Media Training and Support when needed.

If this is you…. E-mail us at lbhmediateam@gmail.com with the following information:

LBH Media Team Application:  
Share a little bit about yourself:  your name, where you live, etc.

How do you define your design style? 

What types of projects do you love to create the most?
(layouts, home décor, gifts, mini books, ect.)

Please share at least 3 of your favorite projects, from within the last 6 months,
that you feel speak to your style as a Designer.

Please describe at least 2 ways that you would utilize social media
to support The Little 
Blue House brand.

Please provide links to all your accounts for the following: 
-Personal Blog, Pinterest, Facebook and Instagram
-Twitter (if you have one)

The deadline for all applications to be received is
Sunday, December 21st  11:59pm
 
 If you have any questions or concerns please e-mail us at
 lbhmediateam@gmail.com

To learn more about the Little Blue House,
explore  our Blog and Website: