

One of my projects was the single-page layout shown below.

For the base I used the cream cardstock but I wanted to add a bit of dimension and color to the background and also wanted to use the green loopy piece of wire in the kit. So I used the wire as a stencil by laying it on the background and spritzing with blue mist. (Since the cardstock is 12"x12" it fit perfectly into a pizza box - clean of course - which made a great spraying station.)
 |
| First spray with blue mist - the droplets add more pattern and interest |
 |
| The wire made a great circular pattern |
I wanted even more color so I placed the wire mesh down again and sprayed with a bright green mist.
 |
| Second spray with green mist |
I repeated in the opposite corner, spraying until I was happy with the colors.
 |
| Finished background |
Once the background was dry, I started to add the patterned paper strips. I cut various patterns into strips approximately 3/4" to 1" wide and varying lengths. I dove-tailed the ends and inked all the edges.
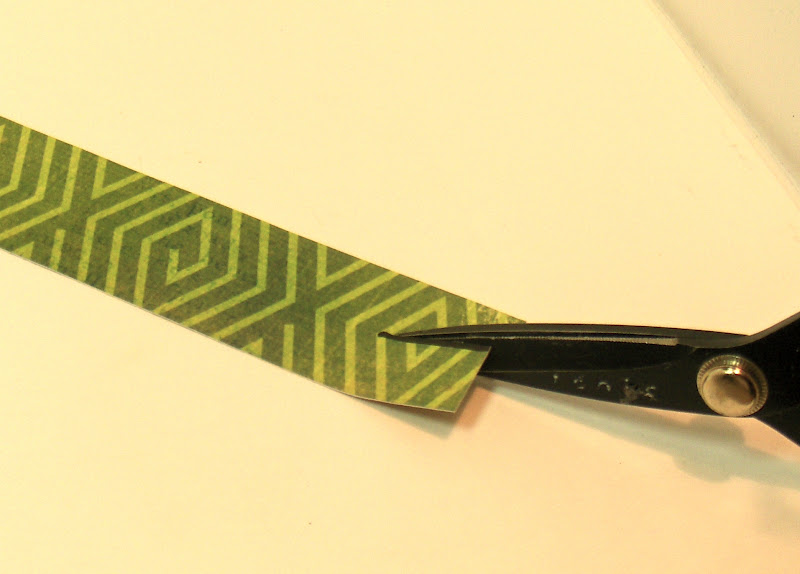
Here's a tip for getting perfect dove-tails.
 |
| First cut a slit in the middle of the width of the piece and as far in as you want the "tails" to be. I've marked this with a black pen in this photo but you would just cut as shown below. |
 |
| Next cut is made from one corner to end point of slit. |
 |
| Repeat for remaining point - perfect dove-tail! |
After adhering all the paper strips, I started layering the additional pieces - a photo and photo mat with the plastic file tab stapled to the top with the date inserted; a piece of the same green loopy wire that I used as a stencil; and the kraft library pocket which I embossed, inked and tied a ribbon around.

I used the beautiful butterfly Front Porch Cutz to embellish the upper righthand corner. I embossed and inked the turquoise layer and covered with Glossy Accents. I sprayed the brown layer with Heirloom Gold Perfect Pearls Mist and glued only the center portion to the other layer, leaving the wings detached. I also added turquoise Stickles to the antennae.

Final touches were adding the title with chipboard letters (these were painted and Stickles added for shimmer) and several of the gorgeous handmade buttons tied with twine.
This kit was so much fun to work with - gorgeous colors and tons of texture!
If you haven't purchased yours yet, don't wait - they are going fast. You can get yours by calling the LBH at 817-431-7930 or by ordering online on our NEW website: www.thelittlebluehouseonline.com
Have a CREATIVE day!

Susan you are always such fun inspiration for the new and fun techniques. Your altered designs so fun and love, love the texture...Thanks for always sharing with us...
ReplyDeleteLove that Susan, what a great idea!
ReplyDelete