Welcome Back!
Thank you for visiting our blog. I hope you are enjoying our Ornament tutorials the LBH gals have shared with you this week! Today, I'm also posting another fun sneak of our NEW Front Porch Kit..."Pass the EggNog". Here's a looksie at some more items in this fantastic kit...
Pre-orders have begun at the Little Blue House or you can order online at www.thelittlebluehouseonline.com.
-----------------------------------------------------------------
Today's ornament is brought to you by Lynette Chiles...She has a yummy ornament tutorial "cooked up" for you today!
Good Morning--Lynette here...Bringing you Ornament #5 of the 12 Days of Ornaments. I love cupcakes and I love to collect ornaments. I have joined the two to create a tasty confection to hang on your tree.
Supplies:
1 paper mache' cupcake (available at LBH)
1inch torn strip of fabric or yarn (chinchilla)
Tacky glue
1 1/2 X 12 strip of paper
3/4 X 12 border punched strip of paper
12" piece of trim
Hot glue
6" baker's twine
Here is aother more vintage version...
Supplies for Vintage Ornament :
Dazzle (Art Anthology) and Silver Stickles
Dazzle (Art Anthology) and Silver Stickles
Beads, rhinestones, Jellies, Etc. for decoration
2 1/2" square matching cardstock
To Begin:
Score and fold 1 1/2" strip of paper. Natural Vintage: 1/4" intervals, Peppermint : 1/8" intervals (challenging), Santa: Cupcake Liner
Attach end to end keeping hills and valleys intact.
Hot glue to bottom of cupcake form.
Add punched border at top of scallop on form overlapping liner. Your cupcake form is actually a box and if you don't want it to come apart, glue the top to the bottom. Trace the bottom of box to cardstock square and cut out. Attach to bottom. If you choose, this piece can match your liner. Santa Cupcake: I actually used a cupcake liner kit that had the liner and topper. To do this you have to remove the bottom of the liner so it will slide onto the form. You may have to add another row of trim or another punched border.
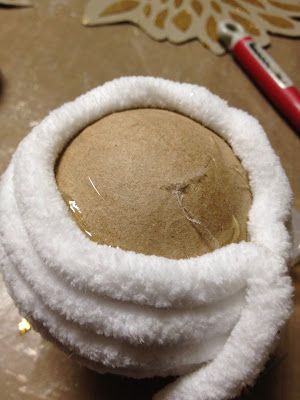
Peppermint and Santa Ornament: Frosting: Attach chinchilla beginning at top of trim and swirl onto top attaching with hot glue or tacky glue.
Tie 6" length of baker's twine in an overhand knot at the end. Glue knot to top of cupcake.
Continue to swirl and attach yarn to top of form.
Vintage Ornament: Use 1" torn strip of onasburg or muslin fabric. Start above trim and swirl and twist attaching with hot glue or tacky glue. Attach hanger as above. Brush on Dazzle by Art Anthology before adding decorations. Brush on silver stickles to liner.
Since cupcakes are all the craze, I am sure you have seen many ways to decorate them. It would be fun to make these confections for a Friend's Birthday or for other seasons.
Hope you enjoy your cupcake - Yum!!!!!!
Hope you enjoy your cupcake - Yum!!!!!!
Be sure to post a comment here for a chance to win your choice of cupcakes. I will be back on Thanksgiving Day with the final ornament and a very special surprise..so stay tuned!
Merry Christmas,
Lynette
Merry Christmas,
Lynette
WINNER from Day #3: Angie Grimm
Congrats to Angie! Please stop by the LBH to claim your Ornament...Thank you for commenting!


OH.MY.CUPCAKE! Those are adorable Lynette!
ReplyDeleteCongrats Angie... and Lynnette these are so darling ..Love them all..
ReplyDeleteI love the cupcakes they are darling!!!
ReplyDeleteLynnette this is adorable!!! Going to make this one too.
ReplyDeleteLooks good enough to eat ;)
ReplyDeleteI love the cupcakes! Too cute!
ReplyDeleteLynette, these are precious. I love love love cupcakes too. Can not wait to give this one a try OR you could just PICK me to win!!!!!
ReplyDeleteYou ladies are so creative. Love, love, love it.
ReplyDeleteThis so cute my favorite is the burlap
ReplyDeleteaura
Congratulations, Angie!
ReplyDeleteLOVE your ornament, Lynette!! I love cupcakes, too, and these are so cute and clever! I'm so glad you made a vintage one--it's gorgeous! Have to try some of these!
Congratulations Angie!
ReplyDeleteI love how you created the different looks! Awesome ornament. I can imagine a whole tree done with cupcakes! Wouldn't this be cute at a bakery?
Love, love, love it!
Congratulations Jennifer!!!
ReplyDeleteLynette, this is a delicious ornament. Thanks for sharing.
Oh my I LOVE cupcakes and these are so cute. I gotta haveme some of these treats.
ReplyDeleteLove all of them!!!!! So if our name is drawn we get all of them - now that's pretty special!
ReplyDeleteLooks good enougj to eat!
ReplyDeletelove the cupcake ornament!!
ReplyDeleteLuv the vintage one!
ReplyDeleteSo cute!
ReplyDeleteCute ornaments and I love the tin.
ReplyDeleteI love cupcake items. These are so cute!
ReplyDeleteOrnament is so sweet!
ReplyDeleteI love, love, love these Lynette! Just adorable!
ReplyDelete